|
 |
|
|
When We Build (part II)
Concrete on the Farm
The progressive farmer must not overlook the economic value of portland cement concrete. Today is the age of concrete. It is crowding wood and steel into the background, and bids fair to become the most universal of building materials. Concrete is extensively used by the largest landholders, and can be used by the men of more moderate means to equal advantage. It is to be recommended for general use by reason of its durability, sanitary qualities and moderate cost. Molded solid, it has no joints nor seams to afford a lodging for dirt and foster the growth of noxious fungi; it can be swept, washed, scrubbed and scalded, without injury to its texture. Further, it does not possess the disagreeable quality of absorbing gases and odors. Add to these qualities, coolness in summer, warmth in winter and we have one of the most logical building materials in present-day use.
Concrete is not expensive when compared with other materials of construction, such as stone, brick and wood. To be sure, the initial cost of wood is less than that of concrete, but when we consider the life and quality of the finished product, concrete is easily cheaper than wood.
Portland cement of the most approved brands costs about $1.60 per barrel, 1-1/4 barrels of cement being required for each cubic yard of concrete. Sand and gravel may be had from the farm or bought nearby at 10 cents a load. Add the cost of the forms and the labor of mixing and laying the concrete, which should be done at an expense not exceeding 75 cents per yard, and we have a total expense ranging from $2.75 to $3 per cubic yard, but under very favorable circumstances the cost may be reduced close to $2. Experience both in practical work and in the laboratory has proved beyond a doubt that the best brands of cement, as in all other goods, are the cheapest in the end, and should be insisted upon by all prospective purchasers. Atlas, Alpha, Saylor's, Edison and Giant cements are among the leading brands. The sand should be clean, coarse and sharp and free from all foreign matter that would in any way tend to weaken the concrete. Broken stone with sand and cement makes an ideal mixture, but it is objected to on account of the cost of the broken stone. Gravel may be substituted for the stone, however, with excellent results. The gravel should be washed and cleaned, and, if very coarse, passed through a screen. The gravel should range from 1/4 inch to 2-1/2 inches in diameter, but should not exceed 2-1/2 inches and to obtain the very best results the major portion should be between the limits of 1 and 1-1/2 inches.Mixing the Cement
In mixing concrete for general use the following proportions are perhaps the best: One barrel cement to 3 barrels sand and 5 barrels gravel. In this mixture the spaces between the stones are entirely filled and when hardened the concrete virtually becomes a solid monolith.
To secure the best results mix the concrete as follows: Have the gravel washed and in readiness, usually on a platform of planking or boards, to permit easy shoveling and insure against waste. Add enough water to the cement and sand, which have been thoroughly mixed in a mortar bed, to make a thin mortar, not too thin, however, to permit easy shoveling. Spread the mortar on the gravel and thoroughly mix by turning with shovels. Then, without delay, shovel the batch of concrete into the forms or spread it on the floors as the case may be, being careful not to exceed layers of 8 inches at each filling. Each layer must be tamped and rammed till water flushes to the top.
Proceed in this manner till the forms are filled. In hot weather damp cloths or boards should be placed over the top of the concrete to keep it from checking after the final layer has been placed in the forms. The forms must necessarily be water tight and the concrete worked back from the boards with a spade, so the softer material may flow to the outside and insure a smooth surface. If this last is not done holes will surely result and the work will be disappointing. Let the concrete rest four to six days before removing the planking, concrete being somewhat brittle until thoroughly hardened, and while in the "green" state easily broken.Making Concrete Blocks
Concrete building blocks are ideal as building material on the farm. The cost to purchase these blocks has been beyond the reach of the farmer who desired to use them for all purposes; but by the use of the simple machine or mold described anyone can make the best quality of hollow concrete building blocks at an average cost of less than 6 cents each, the mere cost of sand and cement.
As the standard size block is 20 x 8 x 7-1/2 inches, instructions are given for making the machine to build that size, but it can be constructed to turn out any size of block by changing the dimensions accordingly.
Take two boards 20 inches long by 7-1/2 inches wide and 1 inch thick. These are for the sides. For the ends use lumber 10 inches long by 7-1/2 inches wide. Care must be used to have the boards free from large knots and with an even grain, so as to avoid warping.
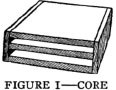
The above four boards were joined at three corners with six hinges; two hinges at top and bottom of each corner. In putting together have the two end boards set up against the sides as shown in Figure I. At the fourth corner place a strong hook and eyelet to hold the machine together when making block, and by unhooking this allows the machine to be folded back away from the finished work, etc.
This makes a mold or form that is, inside measurements, 20 inches long, 8 inches wide and 7-1/2 inches high, with top and bottom open.
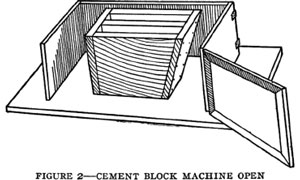
For the core, take two boards of 1-inch lumber, cutting them 13 inches at the top and slanting to 11-1/2 inches at the bottom with a width of 7-1/2 inches. These make the sides of core. For the ends, use 2-inch strips cut 7-1/2 inches long. These are fastened together, as shown in Figure I. This makes a slanting box which is set inside of the machine, as illustrated in Figure 2, and forms the hollow in the block. To the top of the core a round stick is fitted into place the length of the core, so it will set down level with the top for a handle to lift the core from the block when operating the same.To Operate the Machine
First set it on a board somewhat larger than the machine, as shown in Figure 2. This makes the bottom of machine and holds the block until dry. Enough of these boards must be provided for the blocks made each day. Close the machine and fasten catch, then set the core in the center and fill the space around the same with the concrete mixture, tamping it in thoroughly. When full level off the top with a flat stick and carefully lift out the core, setting it on another board ready for the next block, unhook the catch and fold the machine back away from the finished block and you have the completed block ready to dry and cure. This method requires no handling and so has no danger of breaking while the block is yet " green," as it remains on the board or "pallet" until dry enough to be piled up, which they will be in three or four days.
When the blocks are to be laid in a side wall, between corners, take two 1-1/2-inch strips 7-1/2 inches long and attach with screws to the center of each end of machine on the inside. This molds a groove in the block, which is filled with mortar when laying the block in the wall and so securely ties it. By fastening with screws these strips can be easily removed when molding corner blocks.Blocks of Different Shapes
A neat panel block can be molded by taking the common half-round strips, cutting to the right lengths and fastening to the outside of the face of machine, as shown in Figure I. For corner blocks they can be attached to either end of machine. By using small screws these can be removed when not desired and also enable you to panel either right or left end of block as needs require.
For making half-size blocks, have a piece of board that is exactly 8 inches wide and 7-1/2 inches high, or so it will just fit into machine when core is removed. Set this in place in the middle half-way between the ends and fill with material. This will make two half-size blocks for use in breaking joints when laying wall. If desired to have these hollow, two small cores of proper size can be made to set in place when molding blocks of this size.
Rock face effects can be produced very easily by taking a 2-inch plank the size of the face of machine or the end as desired. On this draw a border 1-1/2 inches all around, then take several irons, heat them red-hot and burn out the center in irregular shape, at least 1-1/4 inches deep. By making ridges and hollows in this burning process of different depths and as broken as possible, you will secure a face plate that will mold a very excellent imitation of a rock face. This, of course, can be made to suit any fancy.
One may follow the practice of making several faces and ends from plain and panels down to different rock effects, having these extra face plates the same size as given for the machine above. Then by using hinges as used on doors or any pin hinge, you can easily change the style of block by putting one face plate or end on machine in a moment's time. One machine can thus be used for any style of block and a great amount of time be saved in changing from one style to another.
This machine, in addition to being simple in construction and operation, is very rapid. With but little practice one man can make from 75 to 100 blocks daily and have each one perfect, as he does not break any by handling them after they are molded.
According to her cloth she cut her coat.
-- Dryden.Another Style of Mold
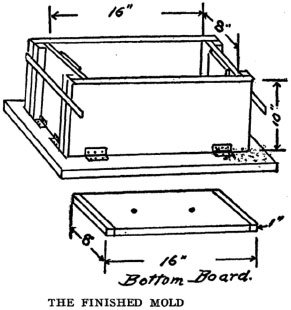
All the lumber necessary to make this mold should be selected white pine or hardwood, free from knots and sap. The platform on which this mold rests should be 14 x 24 inches and be well battened together. The sides are made as shown by the drawings, with a cleat on each end, which overlaps the end pieces and holds them in place. Both ends and sides are fastened to the platform as shown, with hinges, which permit them to be turned down to take out the completed block.
On each end is placed a flat iron bar with a notch in to fasten the whole mold together. These bars are the same as hooks, only the ends are prolonged to act as handles for convenience.Regulating the Height of the Blocks
The bottom board is intended to be fitted in the bottom of the mold loosely and should be blocked up from the bottom to give the required height of the finished block. The end pieces of mold have a thin piece of board running up and down to form a key between blocks and should run down to top of bottom board.
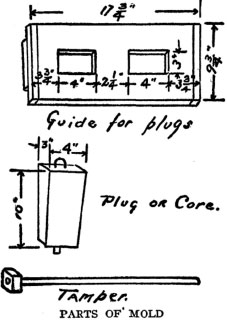
The plugs are made as shown, with a taper both sides, so that when they are removed they clear all the way out. The pins in the bottoms of the plugs are to fit in the holes in the bottom board, which will steady them and hold them in place.
When the plugs are removed the board with the two square holes is placed over the top of mold and the handle of tamper is run through the rings in top of plugs and they are lifted up. This board is used as a guard and prevents the block from being broken when plugs are removed, and should not be used until the block is finished and ready to take out of mold. The tamper is made of a large iron nut and a piece of iron rod about 18 inches long.Filling the Molds
To make these blocks use one part of portland cement and three parts of good sharp sand, mix well and put enough water on to simply dampen the whole. Now close up the mold, put plugs in place, fill the mold one-fourth full and tamp down hard. Repeat this until the mold is filled. Scrape off surplus material, remove the plugs, then turn down sides and lift out finished block which is to remain on the bottom board until hard enough to lift off.
It will be necessary to have a number of these bottom boards. After a number of blocks are made they should be sprinkled from day to day for from 15 to 20 days to properly cure them before using. A barrel of cement will make about 50 blocks and one man can make a block in 12 minutes.Mixing Cement for Brick
Many have found mixing the sand and cement the hardest part of cement brick making. An old vinegar barrel may be put to use by placing a grindstone crank on one end and a pinion on the other. Two strong posts are set in the ground and the barrel hung over two pieces of round iron driven into the posts. A square hole is cut on side of barrel and covered with a piece of sheet iron hinged and a bottom to fasten.
The sand and cement are dampened, shoveled into the barrel and a boy may turn the crank. The mixing is done as fast as two men can mold, with a boy to sprinkle the brick to prevent drying too fast.Reinforcement for Concrete
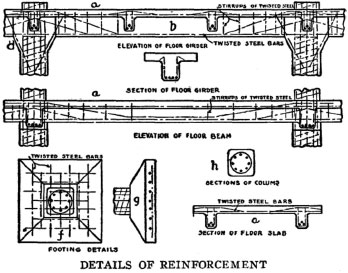
For heavy construction work involving beams and columns, reinforcement with steel rods is needed. Reinforced concrete is rapidly coming to be the most approved kind of construction of large buildings. Our own great building is one of the most noteworthy examples, being of reinforced concrete throughout. For any building where reinforcement seems desirable the following details will be found useful:
Plan of the footing or foundation of each column is shown in f; g, side view of footing and part of column above. The steel rods that run up through column are shown by dots in h, and the wire spiral by diagonal lines in g. h is cross-section of column filled with cement, the shaded part being the concrete. a, section of floor slab, 4-1/2 inches thick; it is also shown on top of the floor girder and floor beam (crossbeams between girders), b, girder; c, cross-section of girder, the dots showing twisted steel bars that take up the tensile stress -- compression stress is carried by the concrete. The steel bars, d, stuck into the column at an angle, are to prevent the girders from breaking off or "shearing" at column.Making a Frostproof Cellar
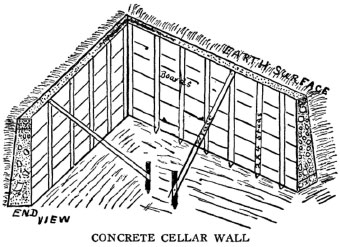
Some farmers build their own concrete cellar walls and chimneys with inexperienced help. Lay out your foundation the same way you would for any building. Have outside line of excavation plumb. Then use 2 x 4-inch studs the length required. Point one end, drive in ground, on line of inside of cellar wall, brace top of stud by driving stake in ground, and nail brace to stake and each stud. You must make everything firm. Then take square edge boards and place horizontally against the studs.
Do not try to go around the whole cellar wall, take one side at a time to the height of earth surface, but turn your corner. Pay no attention to outside, let the stone and cement push up against the earth. It is the best plan to finish the whole wall up to the earth surface line before making the elevation above the ground line.
Above the earth surface line do just the same on the outside as you have been doing on the inside, but now you must use boards and studs, as up to this point the earth took the place of them. Plumb every stud you drive, and place them 24 inches apart. Have cellar window frames ready and place them as you come to them. Be sure and make extension for hatchway when building your main wall. For the corners use baled hay wire in wads, bending it around the center of wall, and a reinforced concrete corner will be the result.
Get cobblestones or any stone from the size of a goose egg to the size of your head, and put them in bottom of wall to depth of 1 foot. Make a mixing bed, say, about 12 x 36 x 72 inches. One man used an old wooden sink as near watertight as possible. Use one water pail of cement to three of fine gravel sand. Put one and one-half pails water in the mixing bed, then add the cement. Be sure and mix water and cement well before using sand. Throw sand in one shovelful at a time. Have one person mixing with a good-sized hoe, while another throws in the sand. Mix well.
Have it about the same as thin mortar, so it will leave the pail easily when pouring into the foundation. Cover the stones and then put in another lot and do the same to height of wall up to within a couple of inches. Do not put stones to full height of wall. To bring wall up to line, mix cement and water together (or one part sand and one cement) so it will run, and after wall is hard pour it on top and it will find its own water level and your sills will fit exactly. It is a good plan to have wall thicker at bottom than at top -- perhaps 18 inches at bottom and 12 inches on top.
Now for hatchway steps. Put in the stones, as they save cement. Before the cement gets hard, drive in some large spikes, leaving them projecting about 2 inches on line of hatchway sills. Your hatchway doors will stay in place if sills are well-fitted on to spikes. One of the most important things is to be sure of the sand you use. If there is more than 10 per cent loam in the sand, your work will be a failure.A Summer Cool Room
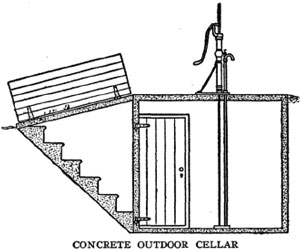
A simple method of constructing a cool, outdoor cellar in localities where the common house cellars are too warm for use during the summer time, is shown in the accompanying sketch. It is a cellar made under the pump, so that the water pumped by the windmill has a very cooling effect. In places where it is difficult to obtain ice, it will prove indispensable to the dairyman who keeps a few cows. Another important item is the fact that a man does not have to pull up all of the pipes every time that he finds it necessary to repair the pipes and pump.
It is constructed of concrete. The top is reinforced with 1/2-inch steel rods placed 1 foot apart each way and the concrete work is about 6 inches thick. The sides are made by using a form, and the stairs are also made of concrete and are reinforced by small steel rods. The cost, including the labor, is about $50. In the west and southwest it will also answer the purpose of a storm cave, which is considered a fixture on all farms.A Concrete Smokehouse
The structure is about 8 x 10 feet and 7 feet high. It will keep the meat inside and thieves out. For a building of this sort 8-inch walls will be thick enough. Excavate to the proper depth below frost, which will be two feet or less, and use a mixture of one part portland cement, three parts sand and six parts gravel or broken stone.
Make the forms of matched boards, although square-edged boards could be used for this purpose. The forms must be well braced and may be raised as the work of laying the wall progresses. Space for a doorway must be left and two eye-bolts inserted in the concrete for the door to swing on. The door jamb can be molded in cement if it is desired. An eyebolt for the lock and latch should also be placed in the wall.
The roof will no doubt be of boards or shingles. The plates should be placed on the concrete and held to it with bolts properly imbedded. An arched concrete roof can be made if desired, in which case it will be necessary to leave suitable vents in each end, or build a small flue to allow the smoke to escape. To make the house absolutely proof against fire a steel or iron door should be used.Laying a Concrete Floor
A concrete floor should be level with the top of the sill, where there is much passing in and out with stock or wagons. There should be about 4 inches of concrete. If the earth is leveled off and tamped down hard, it would be unnecessary to put any crushed stone under the concrete in a building where frost or water does not get underneath. It is generally recommended to put several inches of stones, gravel or cinders on top of the earth, but many floors are laid without such a bottom. Partitions for horse stalls and cattle stanchions can be held in place on a cement floor by putting down iron belts or pieces of gas pipe when the floor is laid. Let them project 2 or 3 inches above the floor.
Making a Concrete Walk
The best way is to dig a trench 16 inches deep, put in a foot of loose gravel or stone, leveling it off with fine material. On top of this spread 3 inches of concrete made of one part portland cement, two parts sand and four parts crushed stone or gravel. On this put a granolithic finish 1 inch thick mixed in the proportions of 1-2-3. Trowel it down smooth and hard. Joints 1/4 inch thick and filled with sand should be left every 5 feet to prevent walk from cracking
Cementing a Cistern Wall
In making a surface waterproof, a mixture of about one part portland cement to two of sand will shed water from a roof or wall, but to make a surface perfectly watertight, so that it will keep out standing water, it is better to use neat cement only, that is, cement with no other material but the water with which it is mixed, and it will cost less to put on a coat 1/4 inch thick of neat cement than one 1 inch thick, one-half or two-thirds sand, as the neat cement mixed with plenty of water is waterproof.
Special Uses for Cement
A sack of portland cement is a very useful thing to have for making quick repairs about the farm. A hole in a drain pipe can be stopped in a few minutes with a little cement, mixed with water, thick as putty. A crack in a barrel can be stopped this way. Hardwood floors may be patched and nail holes filled so they will not leak.
A waterproof floor can be laid over an old board floor in a short time. Sweep the old floor clean and dry and nail down all loose boards. Cover with a layer of heavy wire netting, tacking it down occasionally. Over this lay a layer of concrete of one part portland cement, three parts clean sand, mixed with water to a thin paste.
Smooth thoroughly, but if it is to be used by stock, brush with an old broom to make it rough, then let it dry thoroughly before using the floor. Gutters may be put in where necessary. Holes in an old shingled roof can be quickly stopped by forcing a little cement putty under the shingle where the leak appears.
Some special uses to which cement is being put are the making of bee hives, brick for pavement and ordinary foundations, cement shingles for roofing, grain bins in the form of square boxlike and round barrel-like receptacles. The use of this excellent material for farm structures is only just opening up and it is destined to become the most important material for general farm building.
A wooden reinforcement in the center of a concrete fence post is worse than useless. It does not make a bond with the concrete, and thus weakens, instead of strengthens, the post. Of course, the same is true of wooden reinforcement of any concrete work.A Time-honored Handy Device
(See Frontispiece)
How dear to my heart are the scenes of my childhood,
When fond recollection presents them to view!
The orchard, the meadow, the deep-tangled wild-wood,
And every loved spot that my infancy knew!
The wide-spreading pond and the mill that stood by it;
The bridge, and the rock where the cataract fell;
The cot of my father, the dairy-house nigh it;
And e'en the rude bucket that hung in the well --
The old oaken bucket, the iron-bound bucket,
The old moss-covered bucket that hung in the well.
How ardent I seized it with hands that were glowing,
And quick to the white-pebbled bottom it fell!
Then soon, with the emblem of truth overflowing,
And dripping with coolness, it rose from the well.
-- Samuel Woodworth.
1. Workshop and Tools
2. The Steel Square
3. In and Around the House
3. In and Around the HousePart II
4. Barns and Stock
5. Poultry and Bees
6. Garden and Orchard
7. Field and Wood
8. Gates and Doors
9. When We Build
9. When We Build Part II
10. Worth Knowing
10. Worth Knowing Part II
Next: 10. Worth Knowing
Back to the Table of Contents
Back to the Small Farms Library Index
Community development | Rural development
City farms | Organic gardening | Composting | Small farms | Biofuel | Solar box cookers
Trees, soil and water | Seeds of the world | Appropriate technology | Project vehicles
Home | What people are saying about us | About Handmade Projects
Projects | Internet | Schools projects | Sitemap | Site Search | Donations | Contact us