 Mother’s Alcohol Fuel Seminar
How the Distillation Process Works
Though there are many different designs used for alcohol-producing stills, every installation operates on the same set of principles. These general theories of distillation are impressively complicated, but -- fortunately -- once you understand a few of the basics, you should know enough to design and build your own ethanol plant.
Distillation is the separation of a liquid from other liquids or solids. Because each substance has a fixed rate of vaporization (which varies with heat) -- determined by the pressure the vapors develop in a closed container to achieve equilibrium with the fluid -- one liquid can be separated from other matter by carefully controlling the heat applied to the mixture. Alcohol's vapor pressure happens to be higher than water's, so ethanol's vapor pressure reaches an equilibrium with atmospheric pressure (the point at which a liquid boils) before water's vapor pressure does.
But when water and alcohol are mixed, the boiling point of the combination falls between the boiling points of the separate constituents (water will boil at 100 deg C; alcohol boils at 78.3 deg C). It is the ratio of the water to alcohol which determines the actual temperature of boiling for the mixture. More alcohol lowers the boiling point and less raises it -- so you can see that the temperature of the mash will rise throughout the distillation run as the alcohol is drawn off.
Because alcohol has a higher vapor pressure than water, the vapors given off by boiling a combination of the two will have a disproportionately large share of alcohol. For example, in a mash that has 10% alcohol and 90% water, the vapors released will be about 80% alcohol. To increase that percentage (and raise the proof), the vapors must be condensed and revaporized. Each redistillation raises the proof of the batch further until the liquid reaches an azeotropic condition at 95.57%. The process of enrichment (or rectification) is halted by the balance (azeotropy) of alcohol and water in the vapors.
During simple pot distillation, the proof of the product at the beginning of the run is high ... but as the proof of the mash drops, the proof of the distillate also declines. In fact, the depletion in proof strength is geometric.
Moonshiners can manage to increase proof strength by adding "thumper kegs" or doublers to their stills. This involves running a line from the pot down into a secondary barrel before it continues to the condenser. Vapors from the pot condense in the doubler and raise the heat of low-proof distillate in the bottom of the tank to the boiling point. High-proof alcohol vapors are then released. Several doublers can be added in series to boost alcohol content.
Though "thumper kegs" are sound in principle and do raise proof, they are very energy-inefficient. Still designers discovered that the enrichment process could be more effectively accomplished by stacking one still atop another. This technique is called the pipe column.
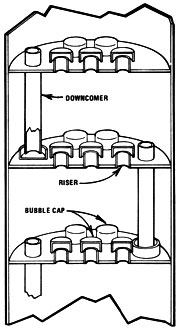
The first column still was a form of what is called "batch run bubble cap plate" design. The pipe column was divided into sections by plates, each of which had a hole in the middle with a short section of pipe (known as a riser) extending upward into the column directly over the hole. An inverted cup or cap was placed above the riser so that it didn't block the pipe's opening. Then another pipe (called a downcomer) was added, extending from a half-inch above one plate, through the next plate up, and ending one inch above that plate. Eight or more of these plates were used in a still.
Before operation, the column was filled with beer so that each plate was covered to the top of the downcomer. When heated, the vapors would rise from the bottom plate and be forced into the liquid above the next plate by the caps. The heat transferred to the liquid by condensation raised the temperature of that level's fluid to boiling, so that a higher-grade vapor was emitted. By the time the vapors reached the top of an eight-or-more-tiered column, the proof was very high. While the vapors rose, the distilled water descended through the downcomers. Hence the name "countercurrent stream" was developed. The countercurrent method was basically just a more efficient simple pot with doubler design -- which still suffered from rapidly declining proof toward the end of the run.
The next design innovation was the development of a continuous-run still, which could take off a steady proof product throughout the run. Early designs had the mash introduced after being preheated to near saturation point midway in the column. At the bottom of the column a reboiler was used to add pressure and heat to the system. These two sources of heat served to equalize the distillation conditions throughout the column. Each plate had the right amount of heat for the percentage of water and alcohol present.
As beer was added to the column, the alcohol vaporized (along with a little water) and rose to the next plate. At this point the water (with a little alcohol) was stripped off and descended to the lower plate. By the time the water fell all the way to the bottom plate, any alcohol that could be released by distilling was on its way to the top of the pipe. With this method, distillation could be maintained indefinitely by adding additional feed at the entry in mid-column.
Today this system has been developed into three basic designs of equilibrium stills: the packed column, the perforated plate, and the bubble cap plate. All three work by the pre-established principles of enrichment and countercurrent flow.
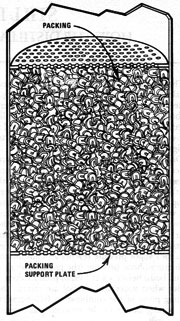
Packed Column
The easiest equilibrium still to design and build is the packed column. Its components are a firebox, a "pot" (which is a tank of some sort), a pipe packed with a material which will leave 60-90% air space, and a condenser.
 Packed column
Here's an example of how such a still might be constructed: Find a 100-gallon tank and build a firebox under it. On top of the pot, make a port -- to allow access for cleaning and loading -- and then weld on a two-foot length of 5" pipe. Atop this tubing, add a reducer and three feet of 2" pipe. Pack this section with a material such as brass, copper, or stainless steel wool. Then reduce the column to 3/4" for the condenser. A still of this design provides 180-proof alcohol for about two-thirds of the run, and then proof dwindles. (MOTHER's packed 6" column still provides an additional example.)
There are a number of advantages to the packed column design. Improvements can yield proof of about 190, and the still can be run either continuously or on a batch basis. On a small scale, packed columns are inexpensive to build and quite easy to operate. However, on a large scale the design presents problems. In order to run continuously, the mash would have to be free of solids to avoid accumulations in the pot. But batch running would be very fuel-inefficient in a large-scale packed column still.
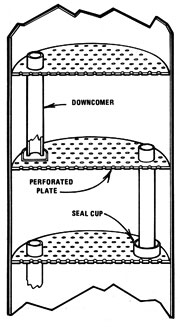
Perforated Plate
For continuous-run applications, it's hard to beat a perforated plate column. Because the construction is simpler than a bubble cap plate and involves only drilling or punching holes in the plates, it tends to be less expensive than the other plate design. Vapors flow through holes in the plates and are cooled by liquid flowing across the plates. Alcohol stays vaporous and rises, while the water sinks through downcomers.
 Perforated plate column
There is one significant disadvantage to perforated plate stills, though. A minimum pressure must be maintained in the still or the liquid on the plate will "dump". Dumping occurs when the pressure holding the liquid on the plate drops far enough to allow the liquid to fall through the holes and down to the next lower plate. This stops distillation, and allows undistilled mash to escape through the spent mash drain. Thus, the perforated plate design presents certain problems for wood or biomass fuel systems where heating tends to vary.
A typical -- and quite good -- perforated plate design was developed by Dr. Paul Middaugh, of the University of South Dakota. Start with two 16' pieces of 12" thin-wall tubing and make 18 plates (from 1/8" metal) the same diameter as the inside of this pipe. Drill 1/2" holes in each plate to occupy about 8-10% of the surface area -- roughly 50-57 holes. Place these plates about 10-1/2 inches apart in one tube to form the stripper column. Then take 24 more plates and drill 490-520 holes (5/32" in diameter) in each one. These plates are spaced 7-1/2 inches apart in their 16' tube to form the rectification column. Each plate also has a 1-1/8"-diameter downcomer with a seal cup on the bottom. Each downcomer extends 1-1/8 inches above its plate.
A 4' thin-wall tube leads from the top of the stripper to the bottom of the rectification chamber. (It takes additional pressure to make the vapor flow downward, so ideally the stripper and rectification columns would be combined in one length. However, this makes the still impractically tall.) Another 4" pipe leads from the top of the rectification chamber to the condenser.
Mash is pumped through the condenser for preheating, and is dropped into the top of the stripper column. The spent mash and solids are pumped out the bottom. Alcohol -- at about 100 proof -- leaves the top of the stripper column and enters the bottom of the rectification tower. Alcohol leaves the top at about 190 proof, and water (with about 0.05% alcohol) drains from the bottom.
Bubble cap plate column
Heat is provided by a steam generator or boiler and is introduced live or through coils at the bottom of the stripper column in the section called the "reboiler".
Bubble Cap Plate
The bubble cap plate distillation column is the oldest design still in use -- it is a derivation of the principle described at the beginning of this section. There are some obvious limitations for do-it-yourselfers in this system. Mash would have to be very free of solids to avoid clogging downcomers and caps, the risers, and the plates themselves. Such a still would probably require the construction of ports for cleaning between the stages of the column.
Solar Stills
In certain areas of the country, solar energy is a viable source of heat for distillation. In other areas it may not be worth the time to even think about it. The advantages seem obvious: solar energy is free, unending, and nonpolluting. However, the disadvantages seem to outweigh the advantages unless one is in an area where the sun can be counted on to shine. For example, the mash has to be run when it has finished the fermentation process, or it will turn to acetic acid within a few days. There are certain chemicals that can be added to the mash to hold it for a while, but doing so only adds to the cost of fuel production.
To make a large amount of alcohol fuel, it would take a considerable number of collectors to make it worthwhile. Also, solar panels seem to be very slow in production and low in product proof.
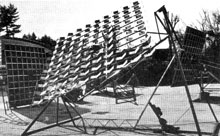
MOTHER's solar furnace
The research staff of THE MOTHER EARTH NEWS built a collector (see Issue No. 56, page 114), according to Lance Crombie's specifications. The results were very discouraging: we never could get more than 20-proof alcohol. However, for those who wish to pursue the quest, here are a few guidelines that the staff discovered which will make the solar still function better.
A solar still works best if the mash is preheated first. A serpentine pattern copper pipe solar panel to preheat the mash before it reaches the still can raise the mash temperature to anywhere from 120 to 180 deg F (48.8-82.2 deg C), depending on the square footage of the panel. Then, as the hot mash enters the still, it will easily flash to a vapor. Remember that water is taken with the alcohol, so this is not more than about 90- to 100-proof vapor. Also, considerable alcohol is left in the discharge, and that will have to be recirculated to remove all the alcohol from the mash. The second running will have an even lower proof.
Alcohol vapors rise, so -- to prevent adding more water to the distillate -- it's best to provide a means of removing the alcohol at the top of the still, not the bottom. If the condensed alcohol vapors are allowed to run down the glass, they will gather the water droplets that have condensed on the lower portion of the glass and thus reduce the proof.
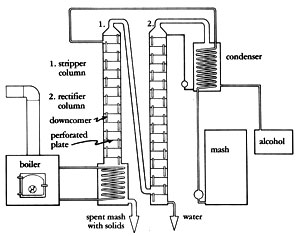
Diagram of 2-Column/Continuous Feed Still
Perhaps one of the better methods of using solar energy is as a heat source in conjunction with a regular still ... to preheat the mash (as described above) and thus reduce the amount of fuel required to bring it to a boil. Also, a large mirrored solar furnace (see THE MOTHER EARTH NEWS No. 55, page 93, No. 56, page 142, and No. 57, page 66) could make enough steam to operate a small distillery.
Much research will have to be done to make a solar still produce large enough quantities of alcohol fuel to warrant the cost of equipment. People with small fuel requirements may find it an acceptable method of production, but they might still wish to have a backup system just in case "ol' Sol" isn't allowed to shine just when the mash is ripe .
The Reasoning Behind MOTHER's Still Design
 The correct designation for MOTHER's column design is differential column. A differential column is one that is packed with some sort of material that provides surface for vapor contact between the phases of fractionating. Three different types of packed columns are used in today's industry:
1. Those that use a conventional packing -- such as ring packings, saddle packings, and other types of designs -- which is dumped or random-packed into the column.
2. Those that use a systematic and geometrical packing, with the packing units placed by hand in particular reference to each other.
3. A "pseudoplate" column where plates of various design without downcomers are used. The Zelthamer plate column (see MOTHER NO. 59, page 80) is an example of such a design.
MOTHER's six-inch column is of the conventional random-packed type. The column is filled with 5/8-inch Pall rings. They provide approximately 131 square feet of surface per cubic foot and at the same time allow about 90% free gas space.
The packing and a packed column are nothing new as far as still designs go. The difference is at the point of introducing the vapors into the column and the method of removing the heat from the column. The usual manner is to mount the column on the batch pot and feed the vapor into the column at the very bottom. Since the column must maintain temperature equilibrium (that is, a decreasing temperature rate in the column, starting with the boiling temperature of the mash at the bottom and ending with approximately 175 deg F (79.4 deg C) at the top), this method controls that equilibrium by the amount of heat in the vapor as it is introduced into the column.
MOTHER's still increases the quantity of distillate produced per hour by forcing more alcohol vapor into the column than it can typically handle. That sounds like a paradox, because if too much vapor is introduced into the column, the heat in the column becomes too high and therefore reduces the column to a simple distillation process. But to overcome this problem, two heat exchangers are built in, which remove the heat and at the same time leave the alcohol. These heat exchangers bring the column into equilibrium and increase the output of distillate from six gallons per hour to eight gallons per hour. Of course, nothing is free in the energy business, and the price that has to be paid is the use of extra amounts of cooling water.
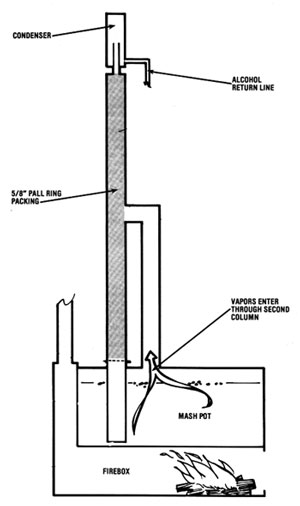
There are two ways of building this type of still. In Illustration No. 1, the vapor is channeled up a separate column and introduced at the midpoint of the packed column. Immediately, the vapor hits the cooling coil (heat exchanger) and its temperature is reduced to 185 deg F (85 deg C). The vapors are condensed to a liquid, and the heat rising from the reboiler revaporizes it. Because of the partial vapor pressure phenomenon, more alcohol is revaporized than water, so alcohol ascends in the column and the water descends in like manner. This vapor/liquid transfer reoccurs time and again throughout the entire length of the column (if the equilibrium is maintained). If any alcohol enters the reboiler, it will "reboil" back up into the column.
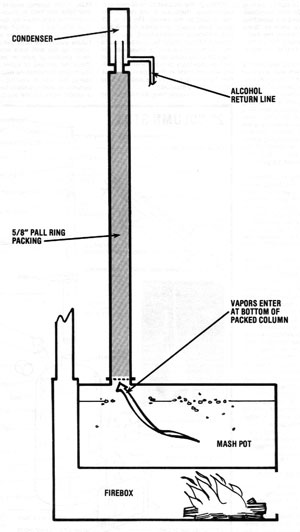
The second method (Illustration No. 2) is to do away with the reboiler and the second column and introduce the vapor into the column at its bottom. No testing has been done yet to show definitive advantages or disadvantages of either design. However, one feature of the reboiler design is that the water stripped from the alcohol is pure and clean. This water is hot and can be used for cooking the next batch of mash. However, if you do not expect to be running a continuous operation, the bottom introduction design is probably the best method of building this still, since manufacturing costs are lower.
Both methods use the two heat exchangers in the column. Also, reliable thermometers must be placed within inches of the top side of the heat exchangers. Depending upon the sophistication desired, this column can be controlled manually or with instrumentation.
The size of the still can be scaled up or down: the principle works, no matter what the size. A larger tank for the batch pot can be used, and the column can be increased to eight or ten inches (you can use a ratio of about 24:1, height to diameter)
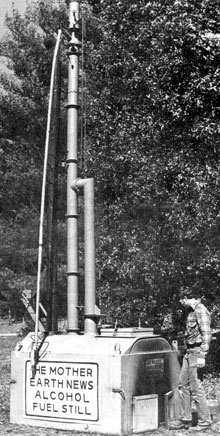
The firebox need not be all metal like MOTHER's (it was made this way to make the still movable), but can be made of stone and brick.
In all, this is a very flexible still, capable of many modifications. You can even obtain as high as 190-proof alcohol by returning some of the distillate from the top condenser for reflux.
However, for an alcohol fuel, all that is needed is 170 to 175 proof -- and this still will give you this moderate proof at a high gallons-per-hour delivery.
Still Operation
When you set up your still, the unit should be leveled and placed upon nonflammable material. If you plan to locate and operate your still indoors, take the necessary precautions in routing the stovepipe outdoors or through an available chimney. Remember also to keep your stovepipe at least 18 inches from walls or other potentially flammable materials, and to make sure the exhaust gases are always traveling upward on their way out the stack.
Even if you operate your still out-of-doors, similar safety rules apply. Clear the area of any leaves or dry grass, and be sure to install at least a five-foot section of stovepipe to the firebox exhaust flue -- this will help to create a draw, and the fire will naturally burn better.
Making Your First 'Run'
- Fill the boiler tank with your mash solution and clamp the access hole lid on tightly.
- Start a blaze in the firebox and keep it burning constantly to assure a steady "steam" flow within the still. Remember that it will take several hours to bring 250 gallons of mash up to temperature.
- Begin running water slowly through all three cooling coils as vapor temperatures within the tank approach 170-175 deg F (76.6-79.4 deg C). (This is the temperature of the vapors above the liquid, not the temperature of the liquid itself.)
- Observe the lower cooling coil temperature -- as it approaches 176 deg F (80 deg C), the alcohol/water "steam" is ready to move up the column. Don't let the temperature. get above 185 deg F (85 deg C), but it's all right to let it stabilize at that point.
- The upper cooling coil should be maintained at 175 deg F (79.4 deg C). Since alcohol vaporizes at 173.8 deg F (78.7 deg C), and water boils at 212 deg F (100 deg C), only the alcohol vapors will pass into the condensation chamber at the very top of the column. The partially vaporized water will fall back into your reboiler to be redistilled.
- At this point, the alcohol will condense (turn from vapor to liquid) in the condensation chamber and drain into your storage container.
- Take periodic proof readings from this point on. (Remember to cool your ethanol product to about 60 deg F (15.5 deg C) -- by soaking your alcohol-filled vessel in cold water -- for the most accurate reading.) If the proof strength starts to weaken, recalibrate your upper and lower cooling coil controls to the optimum temperatures for distillation. Chances are that your thermometers are not totally accurate, so it may take a few "runs" to get the feel of your new still. Also, as the boiler temperature rises (which it tends to do as more alcohol is driven off), so does the column temperature, so to maintain a high proof, more cooling must take place, especially at the upper coil. Let the lower coil temperature rise to 194-200 deg F (90-93.3 deg C) toward the end of your run (after about four hours), and then -- when you can't maintain a good flow rate -- allow the upper cooling coil temperature to rise and switch over to a low-proof storage tank.
'Economizing' Your Alcohol Production
A 250-gallon container of mash takes about four hours to come to a boil, and about four more hours to complete the distillation process -- which will yield 20 or more gallons of 180- to 190-proof alcohol, and another couple of gallons of lower-proof distillate. It is possible to make your entire run straight through and get 180-proof ethanol, but it would take a long time and would waste energy. Instead, take your final gallon off quickly at a lower proof and add it to your next run, thus saving yourself several hours and a pile of firewood.
Also, you can drain your "spent" mash from the still and pour it directly into your mash-cooking vat. If the liquid is still hot, you might want to start a new batch of mash -- but even if it has cooled down, you can still take advantage of the "fortified" water. By the same token, don't waste the heated return water from the condenser coils. It's about 160 deg F (71 deg C), and can be put to use in heating your next batch of mash or even in supplementing your domestic hot water system.
Still plans
More still plans
Mother Earth Alcohol Fuel
Chapter 1
Introduction to a Farmer's Fuel ... Alcohol
Introductory Overview of the Alcohol Production Flow Chart
A Short But Complex Story About Enzymes and Their Functions
Chapter 2
Farm Crops for Alcohol Fuel
Raw Materials
More on Raw Materials
Feedstock Handling and Storage
Chapter 3
Basic Steps in the Production of Ethyl Alcohol
More On Conversion and Fermentation
Fermentation Addendum
Alcohol Yield
Chapter 4
Control of Infection by Planned Sanitation in the Production of Fuel or Gasohol Alcohol
Chapter 5
MOTHER's Mash Recipes for Alcohol Production
Important! Read Before Making Mash
Preparing a Mash From Saccharide-rich Materials
A Handy Hydrometer Jacket
Chapter 6
Distiller's Feeds
By-product Utilization
Animal Feed By-product
More Information On By-product Utilization
Chapter 7
How the Distillation Process Works
Packed Column
Perforated Plate
Bubble Cap Plate
Solar Stills
The Reasoning Behind MOTHER's Still Design
Still Operation
Making Your First "Run"
"Economizing" Your Alcohol Production
Chapter 8
Six-Inch Column Still Plans
Three-Inch Column Still Plans
Bill of Materials
Chapter 9
Two Low-cost Backyard Stills
How To Adapt Your Automobile Engine For Ethyl Alcohol Use
Ron Novak's Do-It-Yourself Water Injection System
Biofuels
Biofuels Library
Biofuels supplies and suppliers
Biodiesel
Make your own biodiesel
Mike Pelly's recipe
Two-stage biodiesel process
FOOLPROOF biodiesel process
Biodiesel processors
Biodiesel in Hong Kong
Nitrogen Oxide emissions
Glycerine
Biodiesel resources on the Web
Do diesels have a future?
Vegetable oil yields and characteristics
Washing
Biodiesel and your vehicle
Food or fuel?
Straight vegetable oil as diesel fuel
Ethanol
Ethanol resources on the Web
Is ethanol energy-efficient?