Spanish version -- Versión en español
This is a cheap, simple, safe and very effective biodiesel processing set-up that you can easily build yourself. It's easy to make top-quality biodiesel this way.
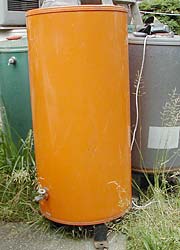
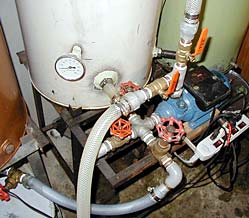
We've used 90-litre mild steel kerosene water-heater tanks, but any similar or bigger or smaller tank with a tight-fitting removable lid will do.
Our 90-litre processor keeps us provided with biodiesel for our Toyota TownAce (which hasn't been to a gas station for six years), and for our small farm machines, plus enough for our barter network, and more if we need it -- for instance, we provide biodiesel each year for a big generator to provide clean power for the two-day Midsummer Peace Festivals at Kyoto, and quite often for a mobile organic food supplier in Osaka, too.
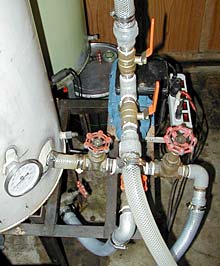
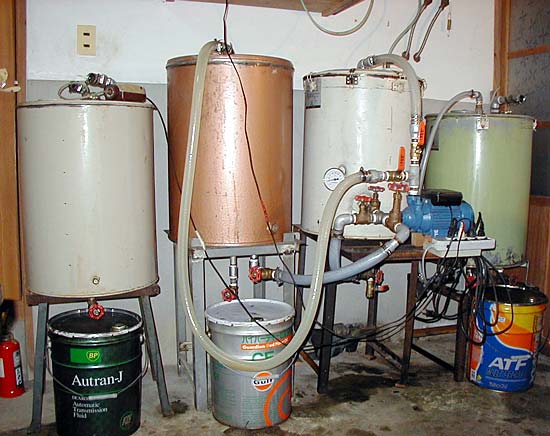 From right: first wash tank; biodiesel processor; settling tank; second wash tank. The extra washing tank is optional, but when needed it effectively doubles the production capacity. |
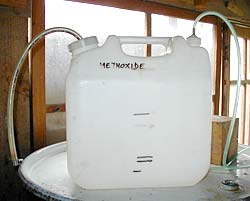
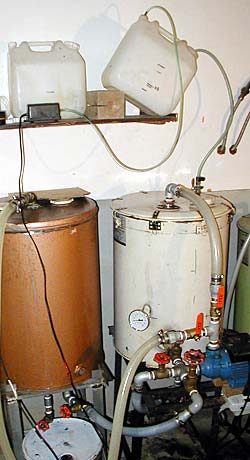 The methoxide is pumped into the processor from the plastic container by air-pressure from a small aquarium air-pump -- no exposure and no fumes. See Methoxide the easy way; see also Adding the methoxide. The processor lid is airtight, held in place with eight toggle latches. |
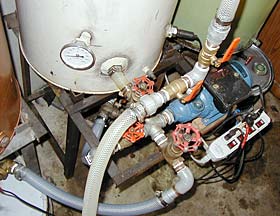
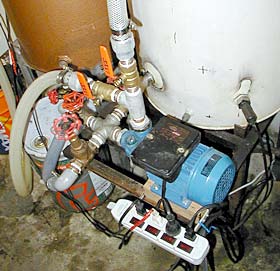
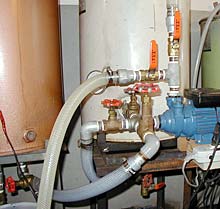
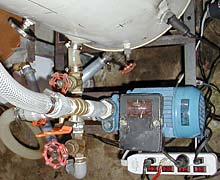
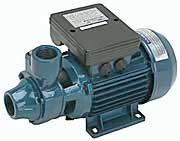
The blue pump is a cheap and widely available 1" clear water pump made in China, with a capacity of about 2,000 litres per hour. It's stepped down from 1" to standard 3/4" plumbing fittings, which lowers the capacity -- still plenty for a 60-litre batch, or even 100-litre batches, but for bigger reactors than that either use 1" plumbing or get a more powerful pump -- or be prepared for either longer processing times or poor process completion, washing problems and poor-quality fuel.
The pump does the mixing for the processing and also transfers the finished biodiesel from the processor to the settling tank, and from the processor or settling tank to either of the two washing tanks.
Use standard plumbing parts for junctions and fittings. Use clear reinforced (braided) PVC tubing. We used hose barbs (male) for the processor inlet hose, and hose barb junctions at the outlet end of the transfer hose and at the inlets in the lids of the settling tank and two wash tanks so the transfer hose can easily be disconnected and reconnected as required. Other hose fittings are short lengths of 3/4" steel water pipe threaded at one end and with deep scores cut around the other end with a metal cutter, all connected with stainless steel hose clamps.
The main expense with this processor set-up was the pump (US$35). Most other parts were salvaged from junkyards, including the tanks and all the valves -- 12 valves altogether, which would have cost about US$100 if bought new. The temperature gauge was also salvaged from a dump, found lying face-down in the mud, but it works and it's accurate.
 |
 |
|||
|
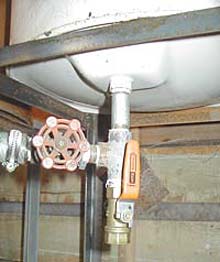
Right: the fitting on the right of the tank is the 1.5kw electric heating element used for maintaining the temperature during processing. Before the process the oil is pre-heated (see below) and then transferred to the processor.
Pump, heater and an aquarium air-pump plug into an extension box fitted to the processor stand. |
||||
   |
We've been using these uncoated mild-steel tanks for more than five years, with all the chemicals -- methanol, KOH and NaOH, concentrated sulphuric acid, occasionally phosphoric acid, also acetic acid, and they've produced hundreds of batches of biodiesel, but there's no sign of any rust or corrosion yet.
We didn't use the more usual 200-litre (55-gallon) oil drums because they're too big and heavy for us. We can get almost the same production capacity if we need to, by settling one batch in the settling tank and a second batch in the processor, and using both washing tanks. And the processor and one washing tank can easily be loaded into our Toyota Town-Ace diesel van so we can take them anywhere to demonstrate how easy it is to be fuel-independent and make your own high-quality biodiesel.
However, this basic set-up works just as well with a standard 55-gal 200-litre drum (but see pump capacity above). Use the open-top kind with a clamp-on lid -- or take a closed-top drum, cut the bottom out, turn it upside down, use the small cap to fit a 3/4" drain and the bigger cap to mount a heating element, and find a cinch-clamp lid that will fit the now-open top. Or, as a Biofuel mailing list member did, make a wooden lid, glue a sheet of plastic on the bottom, fit inlets to it, cover the rim of the drum with silicon piping slit lengthwise down one side, and secure the lid with toggle latches. Other fittings can be cut and welded in place on the drum. The settling tank has two drains, one fitted with a permanent stand-pipe for transferring the settled and separated biodiesel to the washing tanks, the second for draining the glycerine by-product. Some left-over biodiesel comes out with the by-product, drain it all and let it settle, then recover the biodiesel from the top, add it to the washing tank for washing with the next batch.
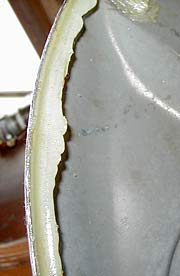
We had to cut the lids off our 90-litre tanks, but if you're careful about it you can do it so the lid keeps its lip and the tank keeps its rim for a tight fit. Use silicon for a seal and, for the processor, toggle latches to hold the lid down tightly (it takes eight toggle latches).
The tank stands are welded together from scrap steel angle-iron, free for the taking from a junkyard. Make the stand high enough for a bucket (or whatever you use) to fit comfortably under the outlet drain. Don't put a cross-strut in the front, leave it open so you can get the bucket in and out easily.
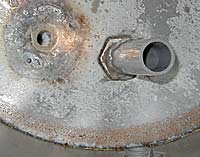
All four tanks came ready-fitted with bottom drains, either 1/2" or 3/4" standard plumbing fittings. The processor tank had a rounded bottom (see above right), but the other three were flat-bottomed. Once you've managed to get the lid off, stand the tank on a couple of bits of 2x2" lumber with the drain in between. There's a rim, the bottom is recessed, so the rim rests on the lumber. Place another length of 2x2" down inside the tank with its end over the drain, and hammer it down with a heavy hammer.
This will give the tank a slightly round-bottomed effect, with the drain at the lowest part, maybe 1 cm lower, which is enough to improve the drainage. The drains are positioned towards the side of the tanks -- lean the tanks forward towards the drain to assist with draining.
We'd have used this tank for the processor if we'd found it earlier: 100 litres, and taller and thinner than the others -- tall and thin is a better shape for processors. But the current processor tank works well, no need to change it.
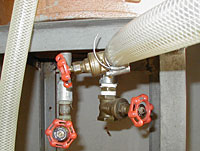
The processor has a T-section and two valves fitted to the bottom drain, one valve for direct draining (after cleaning, for example), the second, horizontal valve for transferring the biodiesel to the settling tank via the pump.
The length (height) of the pipe is calculated to be higher than the depth of by-product in the bottom of the tank after settling. This "stand-pipe" means the biodiesel can be pumped out to the washing tanks without getting any by-product in it. Later we remove the stand-pipe and drain off the by-product.
This method of using stand-pipes ensures that the separated biodiesel pumped to the washing tanks contains NO glycerin by-product.
If you don't use stand-pipes or something similar to ensure complete separation, make sure to drain the biodiesel from the top, first. If you first drain the settled glycerine by-product from the bottom, and then continue to drain off the biodiesel through the same bottom drain, the biodiesel will contain some by-product: glycerine by-product is sticky stuff, after draining a thick coating of it is left sticking to the sides and bottom of the tank, which the much thinner biodiesel washes off and carries to the washing tank, where it causes washing problems.
Other than the outlet drain at the bottom and two caps in the lids, our tanks did not come fitted with the various inlets and outlets and fittings required for the temperature gauge and heating element etc. We used pop rivets where possible, for the methanol inlet valve in the lid and the toggle latches, sealed inside and out with silicon. Otherwise holes had to be cut and female threaded plumbing fittings welded into place.
If you don't have hole saws or drill-mounted cutters for holes this size, use the plumbing fitting to mark out the size of the hole where required, and carefully drill a circle of small holes, maybe 2mm, next to each other just inside the circle. It's easy to cut through the thin metal left between the holes, then remove the inner bit of metal, and use a half-round file to file the edges of the hole smooth until it fits the plumbing fitting. Then weld the plumbing fitting in place. Just to make sure, we sealed the welds with a good layer of a tough epoxy resin with good resistance to biodiesel chemicals, with a layer of silicon on top of that. None of the fittings leaks.
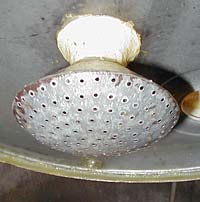
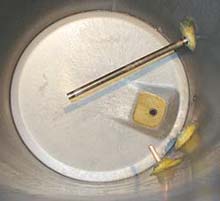
Above: The inlet from the pump -- the mixture doesn't plunge back into the processor in a solid 3/4" jet, which would cause a lot of splashing and unnecessary agitation. The agitation required takes place inside the pump, not the processor. We fitted a 4-inch rose from a Chinese watering can inside the lid, with 150-odd holes, drilled out to 2mm, from whence the mixture droppeth as the gentle rain from heaven upon the place beneath, covering the whole surface. This works very well. Mixing is fast nonetheless -- using the acid-base method, the oil pumping up the vertical inlet hose changes colour less than a second after adding 60 ml of sulphuric acid via a small funnel in the lid.

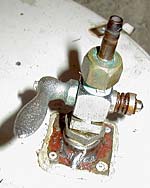
Left: The lid has an extra cap, which previously housed a fill-gauge. We replaced it with a snap-on lid with three different caps: the second one, pictured, has a tube which vents to the outside, fixed and sealed inside the cap with epoxy and silicon; a third cap has a funnel, for use with the acid-base method.
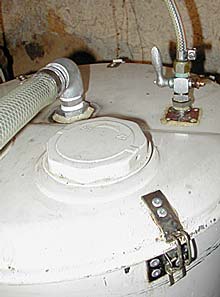
Above, the top of the lid: inlet from the pump top-left, methanol/methoxide inlet valve on right, tank cap in the middle and toggle latch in front (one of eight).
We have the idea that the level of the mixing tank outlet to the pump relative to the bottom of the tank is quite important. With our processor the mixing outlet is set somewhat higher than the level the glycerine by-product will settle at. That level will vary according to the oil (and process) you use. Especially with the rose at the inlet in the lid, there's not much agitation in the tank, mainly just circulation. The necessary agitation takes place inside the pump. The pump pulls the oil in from the tank outlet, but that's not very violent. As a result, a lot of the glycerine by-product settles out during the processing, which is a Good Thing. We think almost half of it settles out before the processing's finished. This does also remove some of the excess methanol, which is dissolved in the by-product.
Aleks Kac's Foolproof two-stage acid-base process has an optional step of draining off some of the glycerine during the base stage. ("The process runs fine without this step," he says. "It's just a twitch to get higher yield" if your processor has a bottom drain.) He said this about it:
"The process is running on the smallest sensible volume of alcohol. While removing a small portion of it with the by-product would seem to slow the reaction down, the rather large mass of removed by-product will tip the scale toward ester production."
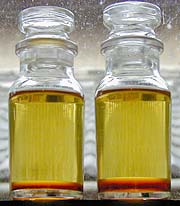
The sample on the left was taken from the top of the processor a couple of minutes before switching the pump off at the end of the process. Immediately after processing, the whole batch is pumped into the settling tank via the processor's bottom drain. What comes out first is already-settled glycerine by-product. Pumped into the settling tank at the lid, it all gets mixed up again before settling. The sample on the right is of the same batch, taken from the top of the settling tank immediately after transfer and allowed to settle -- twice as much glycerine by-product.
We find that's the case -- the settled out glycerine by-product more than offsets any methanol removed, with very satisfactory results.
So this could be a consideration in setting the height of the tank-to-pump outlet.
Having said above that about half the by-product settles out during the process, in fact much more than that does, but some of it is constantly being recirculated (along with its methanol content), and this seems to be about optimal. We tried to figure all this out in advance before building the processor. Presuming about 100% production (which we get, using the acid-base process as standard), and 20% total methanol v/v WVO, the amount of by-product will be 20%, or close to it. So if the depth of WVO being processed in the tank is, say, 100 whatevers, the total depth of by-product that will eventually settle at the bottom will be 20 whatevers, or close to it. We decided to centre the tank-to-pump outlet (1" OD) at 30 whatevers from the bottom. It was kind of random -- we didn't know how much the pump would pull nor quite a lot of other things, but by dumb luck it seems to be about right, we don't want to change it.
The electric heating element is set at the same height.
This might not be very useful though -- it works for this 1" clear water pump with this particular size and shape of processor. It's a 90-litre tank, the diameter is 17.5" (44.5 cm) and the height 23" (58.4 cm), and we process 60-litre batches of oil.
Using the processor
1. Test the WVO for water content and dewater if necessary. Titrate the oil (see also Better titration).
2. Prepare the methoxide -- we get methanol in 18-litre cans and use an aquarium air-pump to transfer it to the methoxide container. The plastic container is translucent, with quantities required marked on the side. Once that's done, add the lye and proceed according to the Methoxide the easy way method. We use KOH, potassium hydroxide, and it's thoroughly mixed in 30 minutes at most. If you use NaOH, sodium hydroxide, it will take longer.
 3. Decant 60 litres of WVO into the pre-heating tank. We do this manually, using a 20-litre steel-bucket oil drum -- the same as our 5-gallon processor. The "girth rib" about 4" from the top marks the 15-litre level so it takes four buckets. We pour the WVO straight from the 18-litre cans we collect it in through a 0.5 mm steel-mesh strainer into the bucket and then into the pre-heating tank. (See Filtering WVO.)
4. Heat the oil to processing temperature.
5. Check that all the valves on the processor are in the correct position -- all closed except the outlet to the pump, and the outlet from the pump set to mixing, not transferring.
6. Transfer the heated oil to the processor. You could use a pump for this, but we found the 1" clear water pump doesn't work very well when it comes to lifting oil, so we drain it back into the steel bucket and transfer it manually. It's quick and simple.
7. Check the temperature on the temperature gauge. Secure the processor lid in position with the eight toggle latches.
9. Switch on the 1" clear water pump.
10. Switch on the aquarium air-pump.
11. Keep an eye on the temperature gauge as the methoxide transfers -- if the temperature falls below processing temperature, switch on the electric heating element. (The element can be fitted with a thermostat or rheostat, but manual control is simple -- BUT don't go away and forget that the heater's on!)
12. When all the methoxide is transferred, switch off the air-pump. Replace the outside vent pipe with a closed cap. Leave the methoxide valve in the lid open: methanol evaporates inside the processor, most of it simply condenses on the underside of the lid and drips back in. The remainder can vent back into the methoxide container, where it will condense.
 13. You can check how the process is progressing via the braided PVC pipe from the pump outlet to the tank inlet, which doubles as a sight tube. (Shine a torch from behind the pipe.)
14. Proceed with processing according to the method you use.
15. When the process is completed, switch off the pump. Turn the pump outlet valve from mixing to transfer. Close the valve from the tank mixing outlet to the pump. Open the tank drain valve (the one on the T) and the corresponding valve to the pump inlet. Make sure the transfer hose is connected tightly with the hose barb to the inlet in the lid of the settling tank. Check that the settling tank drain valves are closed. Switch on the pump and transfer the mixture to the settling tank, both the biodiesel and the glycerine by-product.
16. Allow to settle for 12-24 hours.
17. Switch the transfer hose from the settling tank to one of the washing tanks. Use the pump to transfer the settled biodiesel to the wash tank. First, drain off a few hundred millilitres from the lower valve of the settling tank biodiesel outlet valve (the one fitted with the stand-pipe), close the valve, open the transfer valve and transfer to the wash tank. Close the transfer valve. Open the second drain valve and drain the glycerine by-product into a pail. Allow to settle, then syphon or pour off the few litres of biodiesel from the top for washing with the next batch.
18. Wash the biodiesel as usual. Dry, use.
19. These instructions are easily adapted for use with the Foolproof acid-base two-stage method. The extra cap in the lid is then used for adding the acid.
Suppliers
 Harbor Freight Tools -- 1" Clear Water Pump -- Item 1479-1VGA
http://www.harborfreight.com/
Northern Tools -- Cast Iron 1in. Clear Water Pump, Model# 109955
(Warning -- very BAD at dealing with international orders!)
http://www.northerntool.com/
Northern Tool & Equipment Co. (UK) Ltd. -- 1" Clear Water Pump, Item No. 109955E
http://www.northerntooluk.com/
Biodiesel processors
Introduction
Scaling up
Hazards
Test-batch mini-processor
Simple 5-gallon processor
Journey to Forever 90-litre processor
The 'Deepthort 100B' Batch Reactor
Ian's vacuum biodiesel processor
Chuck Ranum's biodiesel processor
"Foolproof" method processors
The touchless processor
Joe Street's processor
Continuous reactors
How to make a cone-bottomed processor
Biodiesel technology
Biofuels at Journey to Forever
Biofuels
En español -- Biocombustibles, biodiesel
Biofuels Library
Biofuels supplies and suppliers
Biodiesel
Make your own biodiesel
Mike Pelly's recipe
Two-stage biodiesel process
FOOLPROOF biodiesel process
Biodiesel processors
Biodiesel in Hong Kong
Nitrogen Oxide emissions
Glycerine
Biodiesel resources on the Web
Do diesels have a future?
Vegetable oil yields and characteristics
Washing
Biodiesel and your vehicle
Food or fuel?
Straight vegetable oil as diesel fuel
Ethanol
Ethanol resources on the Web
Is ethanol energy-efficient?