
![]()
Search the Journey to Forever website – click HERE
|
Journey to Forever: Make a donation |
![]()
Navigation
| Small farms library | |
| City farms | |
| Organic gardening | |
| Journey to Forever organic garden Handmade soil Village development |
|
| Why organic? | |
| Do it for selfish reasons No pesticides Food quality |
|
| Building a square foot garden | |
| Where to build it Is the soil fertile enough? Raised beds and double-digging The lazy way Paths The sides Sizes and shapes Trellises Cement Soil No compost? |
|
| Plant spacing guides | |
| No ground? Use containers | |
| Container gardening guide Resources |
|
| When to sow what | |
| Sowing times for different regions Seed sowing and harvesting times for Hong Kong Vegetable Garden Calendar for Hong Kong |
|
| Seeds | |
| Catalogs Supplies Herbs Hong Kong |
|
| Garden pond | |
| Pond resources | |
| Gardening resources | |
| Organics resources | |
| Square foot gardens | |
| Companion planting | |
| How much to grow? | |
| General gardening | |
| Herbs | |
| Composting | |
| Small farms | |
Contact usTo Keith Addison Handmade Projects |
Building a square foot garden
Where to build it
Is the soil fertile enough?
Raised beds and double-digging
The lazy way
Paths
The sides
Sizes and shapes
Trellises
Cement
Soil
No compost?
Where to build it
No, in a word. You'll need compost, lots of it, equivalent to a 6" layer or more, especially for poor, compacted, rough ground. If you don't make compost, see our composting pages and give it a try -- it's easy and rewarding, in many different ways!
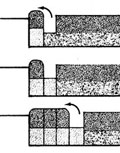
You can "grow" fertile soil from the top down. First build the wooden sides and ends of the beds, about 10-12 inches high. Then put compost in, straight onto the ground, to a depth of at least 6 inches, preferably more. Go right ahead and plant. You'll have great crops from the start. Paths are a waste of soil, and as you walk on them you compact the soil underneath, making it difficult for deep-rooting plants in the beds to send their roots out to the sides. This is how to make use of the path soil. The beds are now too high to stand on their own for long, and making sloping sides that will not fall down will greatly reduce the surface area. Some gardeners make rounded mounds and use the whole area, including the sides.
The original square foot unit is 4x4 ft, 16 sq ft, which can supply one person with vegetables and salads. Many gardeners have found this square block unwieldy. Many people use 3x3 ft beds instead, which works well, with good access all round. 3x3 ft seems to have become the standard size for school gardens using the square foot system.
No ground at all? High-rise living? There's still a lot you can do. You can have a small square foot garden on a balcony, a bigger one on a rooftop. Check the weight considerations for your rooftop, and it might be wise to check the local by-laws. See: City rooftop gardens But where will you get the soil? Use compost. Check the municipality and the agricultural extension office for sources of compost suitable for gardening, and , and the local gardening club. Better to make your own compost (see Composting indoors and Vermicomposting), but it might take some time to make enough. If you can't get compost, leaf-mould will do, but it might be short on nutrients -- add a litre of organic fertilizer such as bloodmeal, ground peanut cake, alfalfa meal, ground steamed bonemeal. Fish emulsion is useful -- check the label to see it's all fish and has no chemical fertilizers added.
Square foot gardening is a clever approach to growing food. It's easy to do, easy to manage, very adaptible, and it produces high yields of top-quality food.
Journey to Forever Square Foot Garden
One square foot garden unit measuring 16 sq ft (1.5 sq metres) holds an average of 130 plants and produces enough vegetables for one person. A family of four can have fresh greens in abundance throughout the growing season and beyond from only 64 sq ft of growing space (6 sq metres).
If you're already an organic gardener, you probably already have everything you'll need: space for square foot beds, fertile soil, compost, knowledge and experience. If you're a row gardener, these are permanent no-dig beds, no walking on them -- like raised beds. If you're a raised-bed grower, use raised beds. See below, Sizes and shapes.
If you have a garden, but you're no expert, or new to growing food, first choose a good site. What makes a good site? Lots of sunshine, and lots and lots of that "well-drained, rich, loamy soil" the seed packets tell you to plant your seeds in, as if the stuff grows on trees. So just choose a good place where there's enough light, we'll fix the soil.
Take up a bit of lawn if you like, the soil under a lawn is usually quite good. Use a sharp spade to cut through the turf: make vertical cuts (use your foot), slicing it up into one-foot squares, then peel the squares off like a carpet.
You only need to take off a couple of inches. Pile the squares in a block, grass-side down, wet thoroughly as you go, cover the top with a garbage bag to keep it moist, and it will rot down into a useful supply of well-drained, rich, loamy soil.
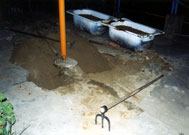
We broke through the cement patio, dug out lots of beach sand and added LOTS of compost
If you have some suitable garden space with fairly good soil you've been using for growing, use that. If all you have is some rough, hard ground, don't despair, it will do, with a bit more trouble. Put some pegs in the ground and use string to mark where the beds will be (include a 15" path space round the beds), and then cover it with a thick layer of hay, grass clippings, dead leaves, anything that'll make a good mulch. Make it at least six inches thick; if it sinks, add more. Keep it well-watered, and don't let anyone walk on it. After a few weeks the ground will be much softer. Scoop off the mulch (you can use it later in the garden or in the compost), and you can begin.
If you don't have mulch, use an old carpet, or lots of newspapers or cardboard cartons, or even garbage bags. Give the surface a good sprinkling first (not enough to puddle or muddy it). Keep checking to see the soil is moist, sprinkle again if not.
You can also use this method to prepare lawn for growing beds rather than removing the turf, though it'll take a while. Carpets work well.
You can use almost any piece of rough ground, if you have nothing else. Just use more compost if you can. If the ground is too hard for digging, build your beds with at least 6" of pure compost on top of the ground, contained by wooden sides, and start growing straight away. Keep adding more compost as you can. See below, The lazy way.
No ground at all? Got a cement patio? A balcony? A rooftop? See below, Cement.
Is the soil fertile enough?
It's best to have enough compost for the job to hand when you build your beds. Second best is to use what little you have or can lay your hands on, and add more later. You can start growing plants in the meantime and dig more compost into the top few inches around the plants or in empty squares as it's available, using a trowel.
One of the beauties of square foot beds is that you can treat each square foot separately.
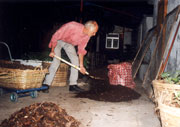
Keith bagging finished compost
You might be able to buy compost at a reasonable price: check with the municipality or your local agricultural extension agent, and the gardening club, if there is one. The so-called potting composts and multipurpose composts on offer in garden centres are usually not compost at all, they're potting soil mixtures: you want organic compost, made from organic wastes by "hot" composting. Vermicompost -- worm manure -- is as good or even better, but it's expensive.
An alternative is well-rotted manure, if that's really what it is: it should be black, crumbly stuff with an earthy smell, NOT the "farmyard manure" that consists of sticky lumps of trampled dung mixed with bits of straw and hay and smells bad. If you think that's good stuff, as many people will tell you, try feeding it to manure worms and see what happens (they die). Sir Albert Howard, the founder of the organic farming movement, said farmyard manure aas the great weakness of European agriculture and campaigned to reform the odious "manure pile" that produces it. He failed to reform it, but believe him!
Raised beds and double-digging
Double-digging is hard work, but these beds are small, and if your soil is quite good it won't break your back. If the soil is bad, this is how to fix it once and for all. You only need to do it once, never again.

Use a sharp, straight-edged, flat-bladed digging spade with a D-handle for double-digging
You need a digging spade and probably a digging fork (or spading fork). D-handled tools are best for this. If the cutting edge of the spade is blunt and burred, sharpen it.
Mark off where you want the beds. Leave space for 15-18-inch-wide paths. Cover the path area with boards so you don't compact the soil by trampling it too much.
Cover the whole surface of the bed with a layer of compost (up to 3" thick), and sprinkle some ground limestone over it (or garden lime if you can't get ground limestone) -- a thin sprinkling, like icing sugar on a sponge cake.
 Start by digging a trench across one end of the bed a spade deep and a spade wide. Take thin slices (try half an inch), mixing in the compost as you go. Thin slices are much easier on your back and mix the soil better. Put the soil in a bucket or a wheelbarrow and dump it at the far end of the bed.
Cover the bottom of the trench with another 3" layer of compost sprinkled with lime. If the soil in the bottom of the trench is fairly soft, use the spade to loosen it, again a spade deep, mixing in the compost as much as possible. If it's too hard for a spade, use the fork instead.
Double-digging
Now dig a second trench alongside the first one (thin slices!), moving the soil into the first trench, mixing it well. Compost the bottom of the second trench, dig it or fork it, then dig a third trench, and so on right down the length of the bed. You're left with an open trench at the end, which you fill with the soil from the first trench.
Now you've loosened and conditioned the soil to a depth of about 16" and added about 6" of compost, and loosening the soil will have added some height, so the surface of the bed will be at least 6" higher than the path.
The lazy way
Keep adding more compost on top as the surface sinks. The plant roots will steadily penetrate the soil below, worms will mysteriously appear even if there didn't seem to be any before, all doing your deep-digging for you.
Before too long the soil will be soft, deep and fertile. Just keep adding compost. There's no such thing as too much compost.Paths
If you're making two parallel beds (see below, Sizes and shapes), you'll have three paths, one on either side and one in the middle, plus a short one at each end. Dig out the side paths (thin slices!) to a depth of about 4", spreading the soil on top of the adjacent bed. For the middle path, spread half over one bed and half over the other. Spread the soil from one end path over one bed and from the other over the second bed. The sides
Better to board up the beds so the sides are sheer and stable, with the whole surface area to grow in.
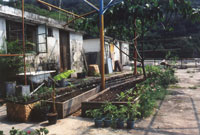
New raised beds for the Journey to Forever garden
There's a great debate over which kind of boards are best. We think free boards are best -- recycled container pallets will do, or thicker boards if you can get them. Don't use pressure-treated lumber! It's got arsenic in it and other toxins, and no matter what they might tell you, it will leach out and get into your plants, and quite possibly into you too. There's another debate on how to weatherproof them. Don't use creosote! -- it's a plant poison. Paint or spray them with vegetable oil, or, better, linseed oil. Some linseed oil has toxic preservatives added -- check the label (or use food-grade flaxseed oil, it's the same thing). Or try this 100-year-old recipe for "Everlasting Fence Posts":
"Take boiled linseed oil and stir in it pulverized charcoal to the consistency of paint. Put a coat of this over the timber, and there is not a man that will live to see it rotten." (From "Lee's Priceless Recipes" 1895)
The sides should be about 12" high, but use your judgment. When you've built them, spread a third layer of compost on top and hoe it in lightly to condition the soil added from the paths.
The soil will settle a bit in time, but it should still leave your plants with a root depth of about two feet of highly fertile soil to wriggle their toes in. This will support the kind of cropping intensity and crop quality you require from a square foot garden.
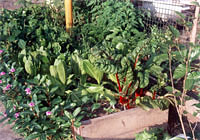
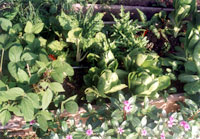
Greens growing happily in the beds
Put more boards on the paths, or flagstones, or gravel. Or (better) fill them with dead leaves or rough mulch (top up as it sinks). All these will help protect the soil from compaction as you walk on it, while mulching will steadily enrich it -- useful space for deep-rooting vegetables.
Sizes and shapes
We adapted the square foot principle to the space we had, as many do, and ended up with two long parallel beds and several other smaller ones.
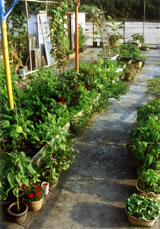
Two long beds and baskets made more than 50 square foot spaces
In general we prefer long beds (like the traditional Chinese farmers in the local villages), and this is what we recommend: units consisting of two parallel beds, each 2ft wide and 8ft long, with a minimum 15"-wide path between and around them. This is enough for two people, or if you want more or there are three of you, make two units with 6ft-long beds instead of 8ft, or two units with 8ft-long beds, and so on. Paths should normally be wider, wide enough for a wheelbarrow, but these beds are short, so save space and use buckets if you need to.
Square foot beds should face the sun (south-facing in the Northern Hemisphere, north-facing in the Southern Hemisphere), so there's a front and a back. At the back there's a trellis for climbers (see below), so if you want to make ranks of units, one behind another, they'll have to be quite far apart to allow the sun to reach the rear ones over the trellises in front. You'll have to figure it out. Otherwise have them in line. Or both. Or scatter them about wherever you can fit them in.
Trellises
Standard square foot trellises at the rear of each unit are a simple hoop made of electrical conduit pipe, two sides and a top, with wires or string running from the top bar to the ground every foot for the plants to cling to (or be tied to).

We made a trellis out of an old bamboo ladder and string
This is a neat system, but you can use whatever you like, as long as it fills the function. We use bamboo. The standard height is 6ft, but our last tomato crop went up nearly 12ft, and so did the cucumbers, and the beans appreciated as much height as they could get. Higher is better for trellises -- if it's needed it'll be there, if not it won't be in the way.
Cement
Depending on the soil, the water content, etc., a square foot unit measuring 16 sq ft and 12 inches deep will weigh somewhere around 650 lb (300 kg), or 40 lbs per sq ft (200kg per sq metre).
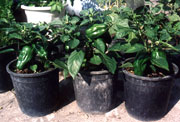
These miniature green peppers in 9" pots produced heavy crops for months.
You can break up a unit any way you like to fit the space available, right down to single one-foot squares, in boxes or baskets or whatever containers you can find. It then merges with container gardening.
If you use beds, say two 2x4 ft beds with wooden sides, you can just stand them on the cement. If the soil is rich and 12" deep your plants will thrive, and the beds won't leak unless there's a real storm. It might stain the cement underneath, and if that bothers you, try putting them in big wooden trays covered with two thicknesses of heavy-duty plastic.
Soil
Try to include some good topsoil, or any soil, mainly for the sake of the clay content. Add some lime (ground limestone, about half a litre), and/or wood ashes (2 litres). You can also use sphagnum peat moss, coconut coir, perlite, though they're inert and don't contain any nutrients. Sawdust can be difficult stuff in garden soil, best avoid it -- especially sawdust from pressure-treated timber, which has poisons in it. No compost?
Liquid seaweed emulsion is one of the best sources of micronutrients and a real soil and plant health booster. Use some in the watering can every two weeks.
Tip:
Spray transplants with seaweed emulsion before you replant them, especially bare-root transplants.
Probably the best fertilizer is diluted urine (1:4 water). It's the mainstay of a successful container farming project in Mexico City: "Regarding fertilizer, considering the expense of commercially prepared fertilizers, the amount needed for a full-size deck garden and the fact that many of them don't work well, I have found that urine is the best fertilizer for this system. The decaying leaf medium breaks it down almost instantly so that there is never any odour, and germ survival in material such as this has been shown to be practically nil. This is a key element in this technology, is abundant, with no cost, and easy to manufacture." -- Container Farming -- Organic food production in the slums of Mexico City
Raised Bed Agriculture -- Minifarms Network: "For home gardening raised bed agriculture means: less work, less irrigation, improved soil, higher yields and no poisons. For market gardeners, mini-farmers and mini-ranchers it means all the above plus profits. RBA creates a healthy soil to grow healthy plants to provide healthy food to feed healthy people." 2,200-word article from Ken Hargesheimer in Texas, who has taught organic growing in permanent raised beds worldwide.
http://www.minifarms.com/rba.html
City farms
Organic gardening
Why organic?
Building a square foot garden
Plant spacing guides
No ground? Use containers
When to sow what
Seeds
Garden pond
Gardening resources
Composting
Making compost
Composting resources
Composting indoors
Vermicomposting
Humanure
Composting for small farms
Small farms
Small farm resources
Community-supported farms
Farming with trees
Farming with animals
Pasture
Pigs for small farms
Poultry for small farms
Aquaculture for small farms
Composting for small farms
Controlling weeds and pests
Small farms library